
There is one sure thing when working in Marketing, time is your most valuable asset! When it comes to preparing your next marketing campaign, every minute counts. One of the most time consuming tasks when launching a marketing campaign is often creating the visuals you need to support it. Especially if you don’t have a full design team in your company.
As I’m sure you know, the best performing visual format nowadays is video! No matter if we’re talking about advertising or organic content, video content brings more reach and engagement across all marketing channels. But they come with major caviat… They take ages to produce!
But don’t worry, like almost anything in marketing nowadays, you can automate the production of videos thanks to tools like Abyssale. So sit tight, grab a coffee and come along for this tutorial on how to auto-generate videos from Google Sheets with Zapier and Abyssale.
Why auto-generating videos ?
This automation and productivity tutorial is life saving in many marketing situations such as:
- Generating multiple advertising videos for social media ads based on marketing content you’ve written in Google Sheets (or any database). You could need this to promote multiple e-commerce products, AB test your videos, or try different Titles and call to actions.
- Generating Personalized videos for Linkedin outreach and send them via a custom merge tag.
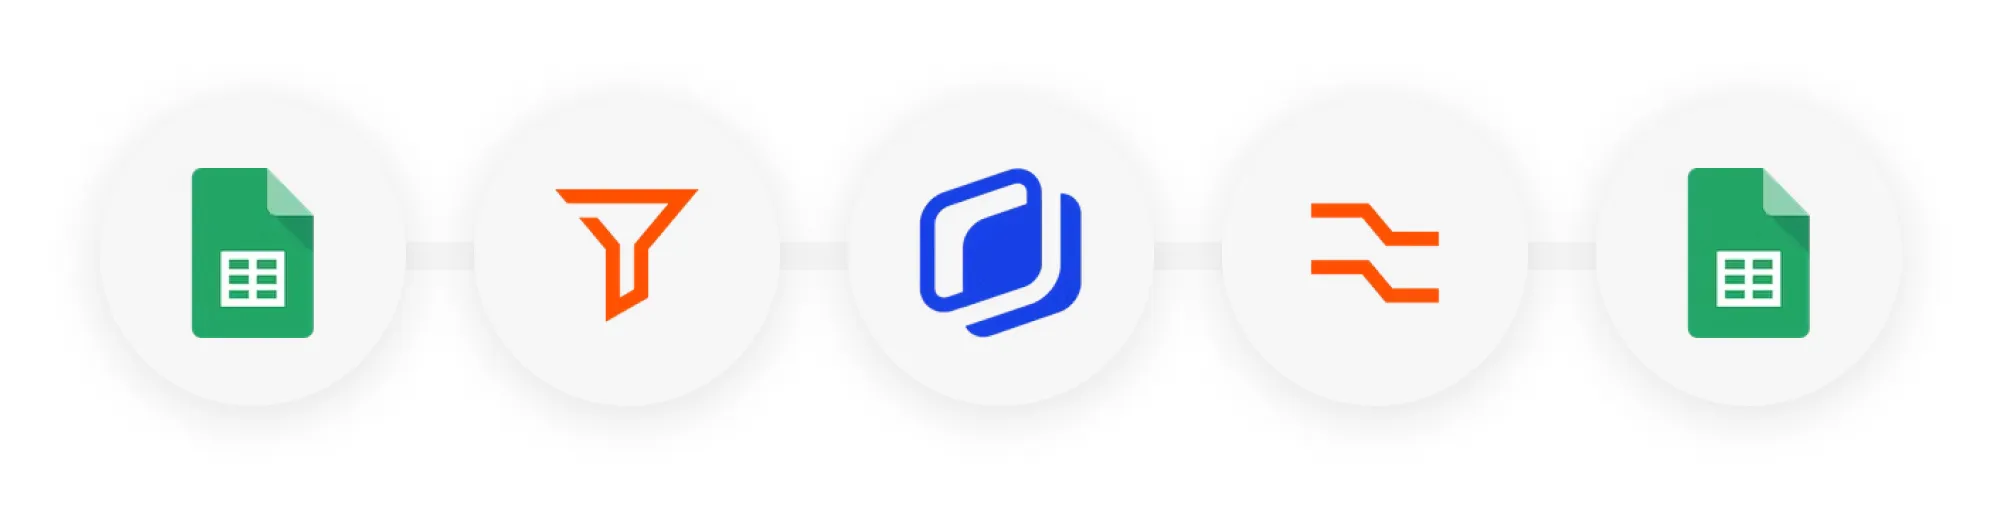
The tutorial will be divided into 4 parts:
- Creating an animated template in Abyssale
- Connect your Google Sheets containing your content to Zapier
- Generating a video with Abyssale for each line of your Google Sheet
- Send the video URL back to one of your Google Sheet column
Preparation
Let’s say you’re an e-commerce shop preparing a Facebook and Instagram Ads campaign for 4 products and you’ve decided to try out a video format for those ads. The problem is that you don’t have time to produce 2 videos for each product (8 in total). So we’ll automate this process with Abyssale and Zapier. Here is how the workflow will unfold :
- Export your product information into a Google Sheet file (Product Name, Price, Picture, CTA)
- Add a “Trigger” column to control the launch of your operations (Draft, Launch, Success)
- Add a “result facebook” and “result instagram”, where you final video will be sent
- Go to Abyssale and create an animated template. (You can pick one from our public library)
- Then go to Zapier, login and create a new Zap.
Step 1 : Fetch your Google Sheet data
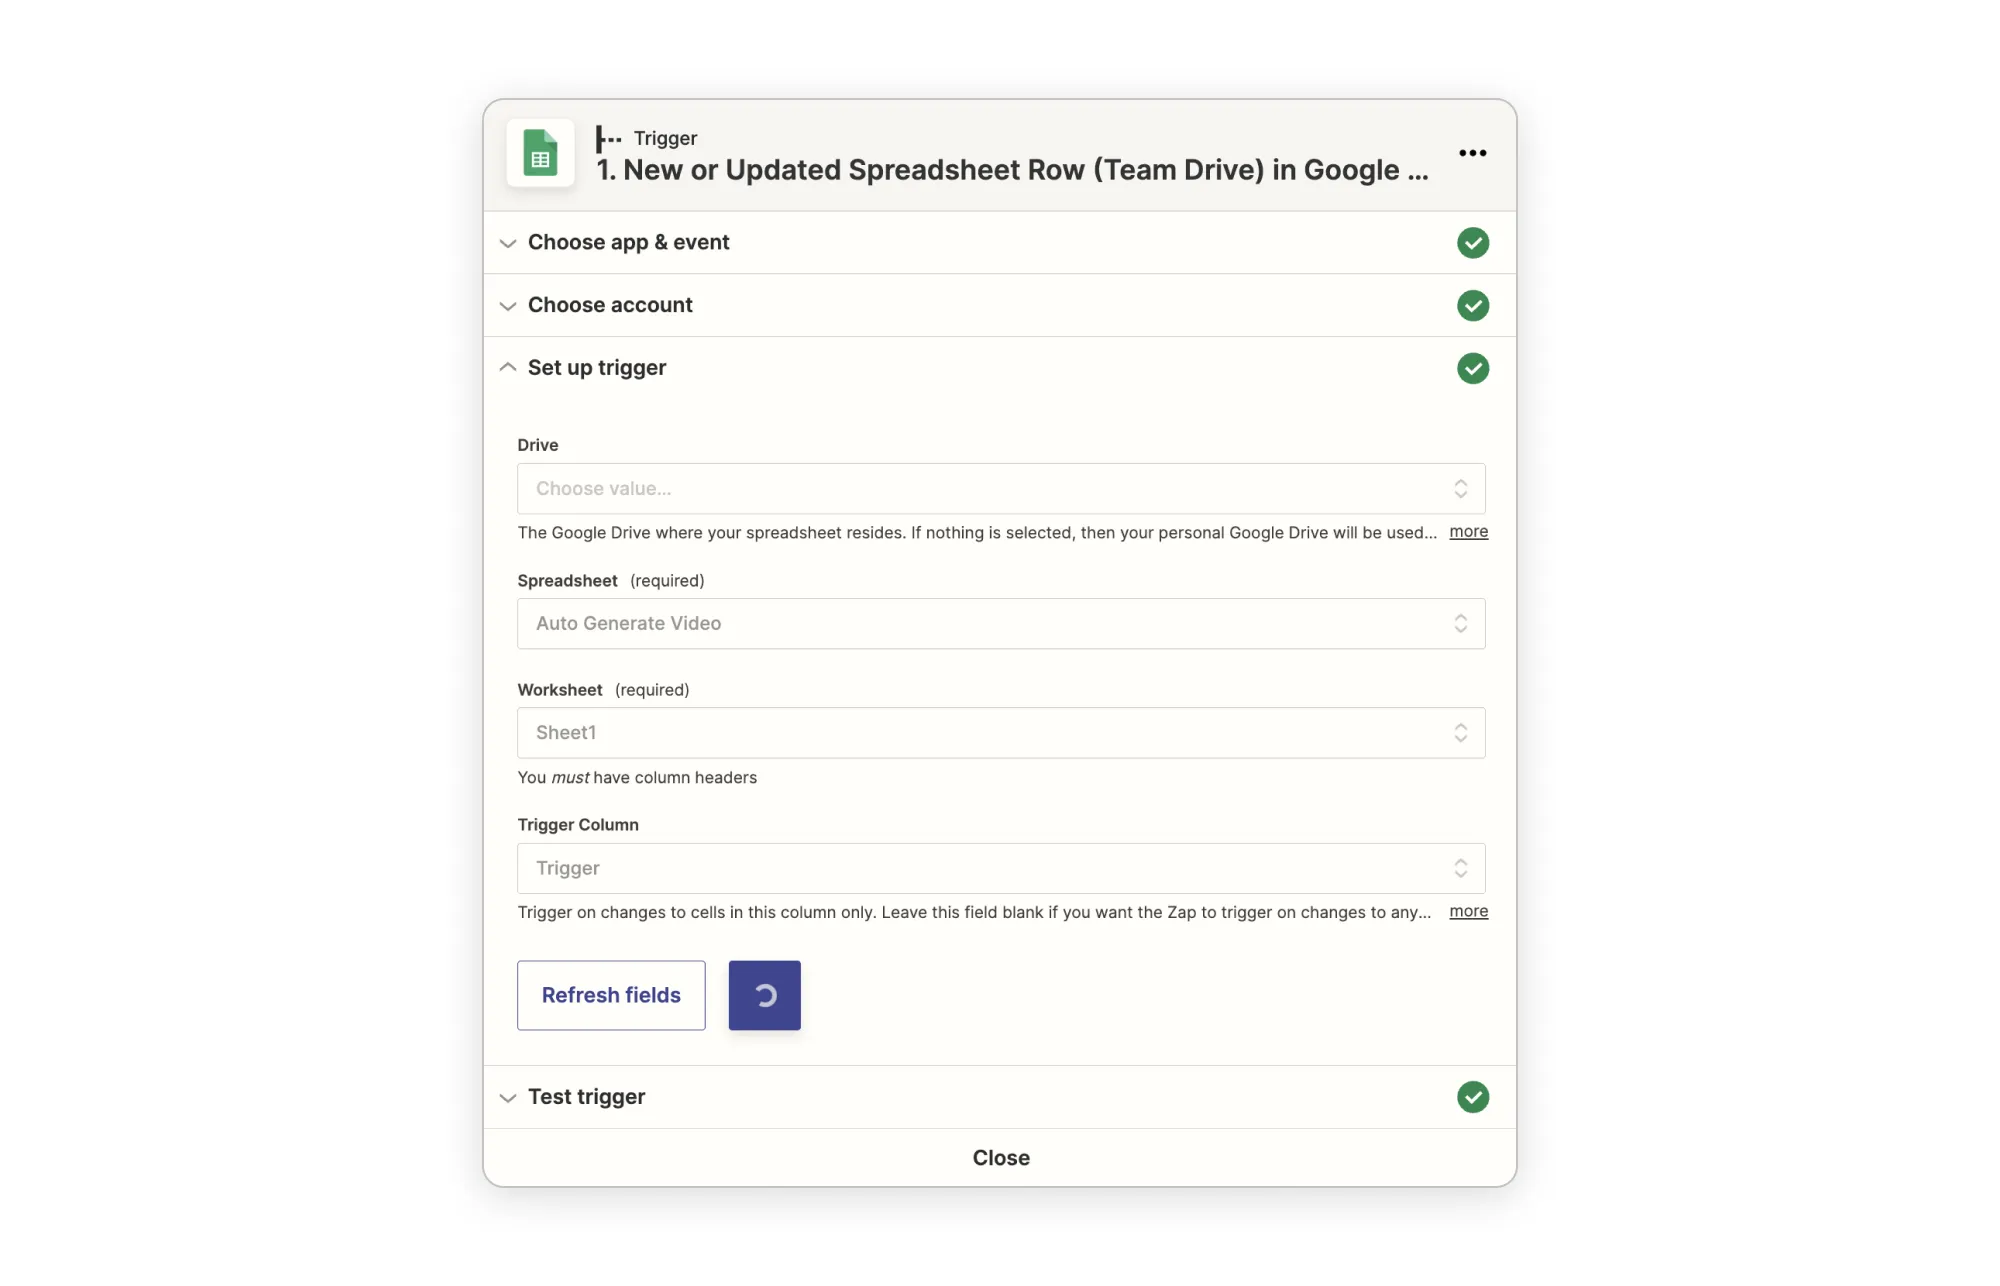
- Choose Google Sheets as your first service
- Choose "New or Updated Spreadsheet row”
- Connect your Google account
- Select your spreadsheet in the list and the related Sheet you would like to import
Step 2 : Add a filter
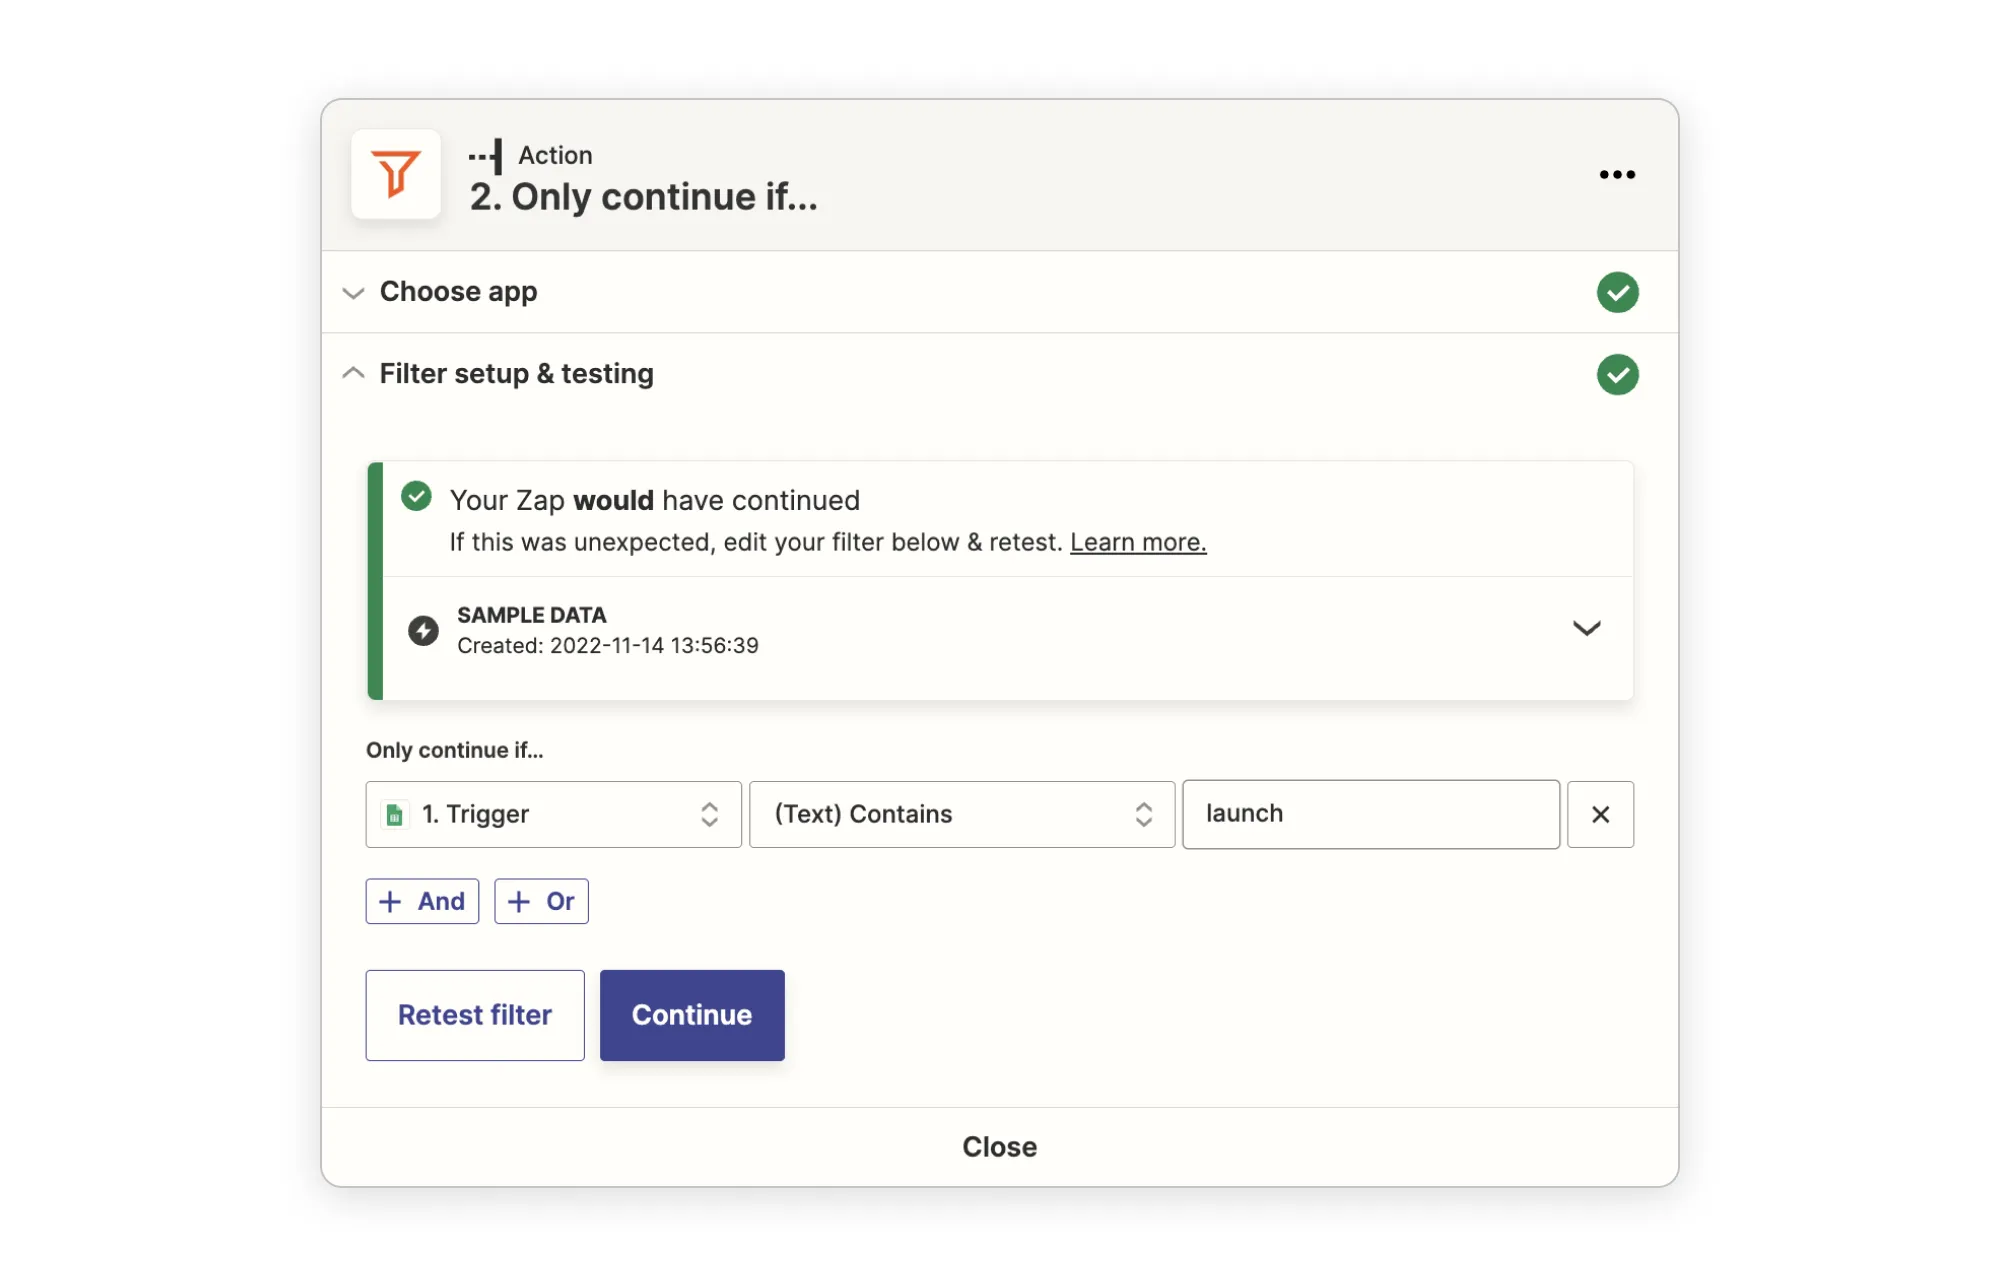
In order to process only the rows where your content is ok and ready to be turned into a video, we’ll add a filter that will check the content of the “Trigger” column for each row that has been updated. If the row contains “Launch” it will be cleared to go through the next steps. If it contains “Draft” or “Success”, the Zap will stop there.
Step 3: Generate a Video with Abyssale
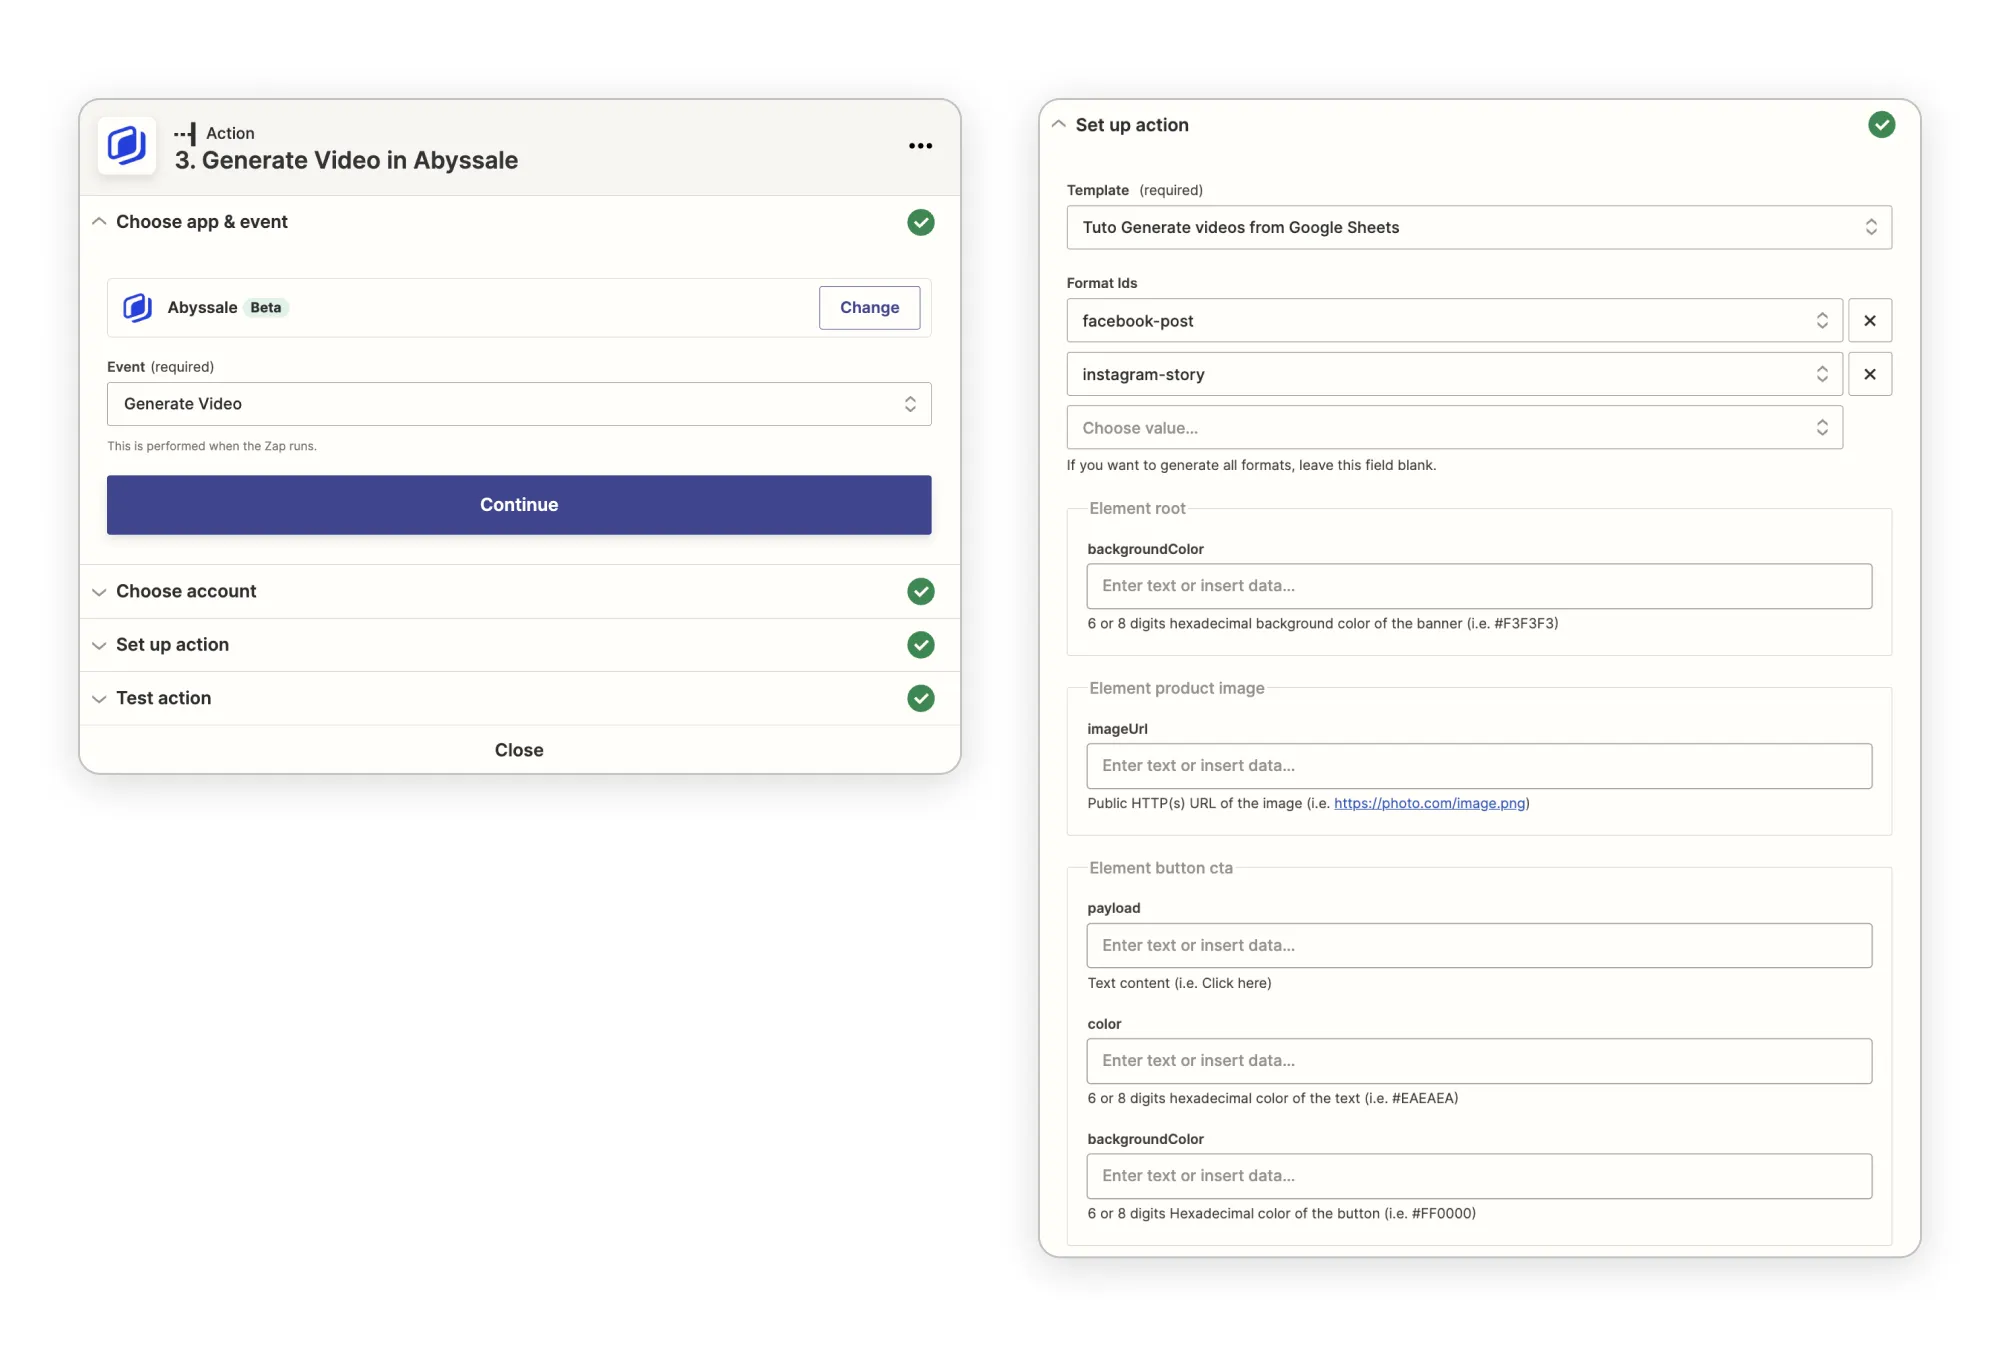
- Create a new module & select Abyssale
- Choose « Generate video in Abyssale »
- Connect Abyssale with your API Key. You can find it here
- Select the template you created during the preparation step.
- Then you have to select the formats you want to generate your video in (Facebook Post, Instagram Story) and match your Sheets data with the fields you want to populate inside your Abyssale template.
Step 4: Parse the result of your Abyssale video Generation
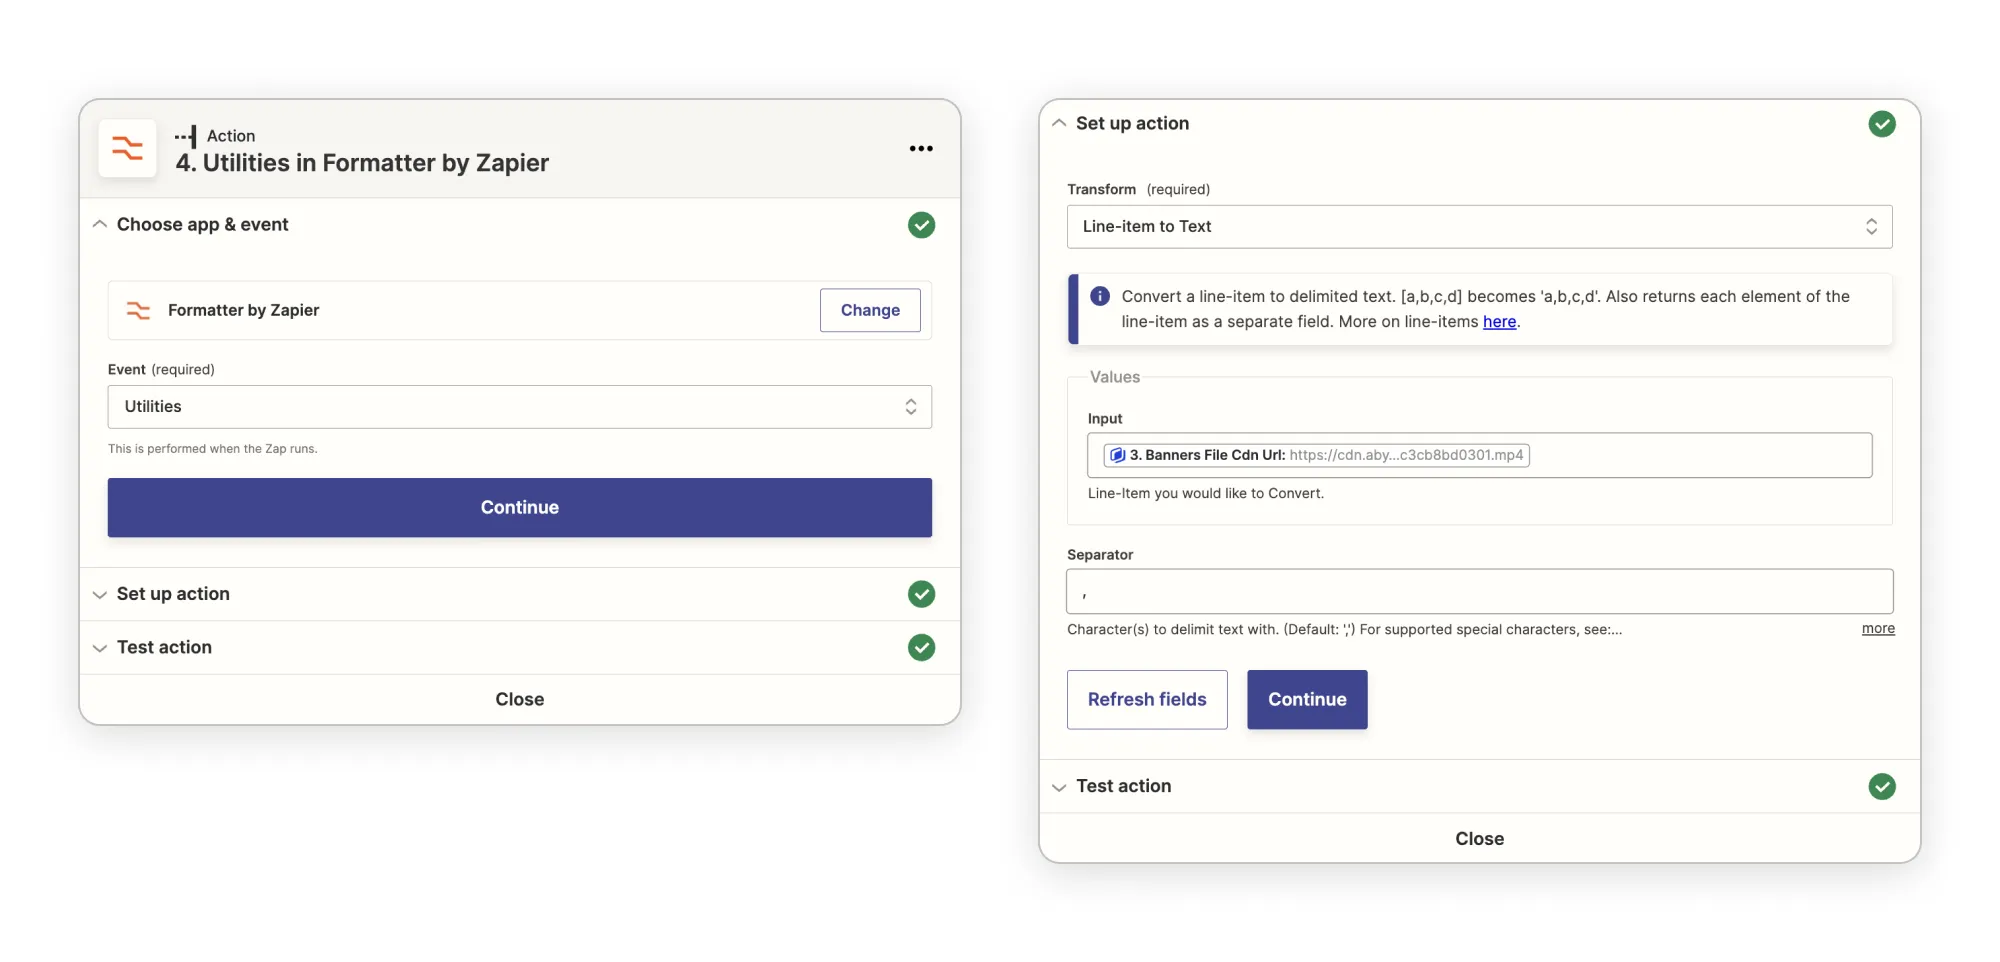
Once the generation is complete, Abyssale will give you a string of URL separated by a “,” containing the URL of each of the format you’ve generated a video from. The problem is, you need to separate each URL to be able to use the video independently. To do that, we’ll use the Zapier format utility.
- Create a new module and select “Format” in the “built-in” tools section
- In the event type, select “Utilities”
- In the “Transform” Field, select “Line item to text”
- In the “Input” field, select the custom option and the Abyssale result named “Banners File Cdn Url”
- In the “Separator” field, type in a “,”. This is the character that will be detected by Zapier to separate a single line of text into multiple items
- Once your module tested, you should a result looking like this. Item 1 being the URL of the video generate from you first format, and Item 2 the video generated form the second Format.
Step 5: Update your Google sheet row with the urls of generated videos
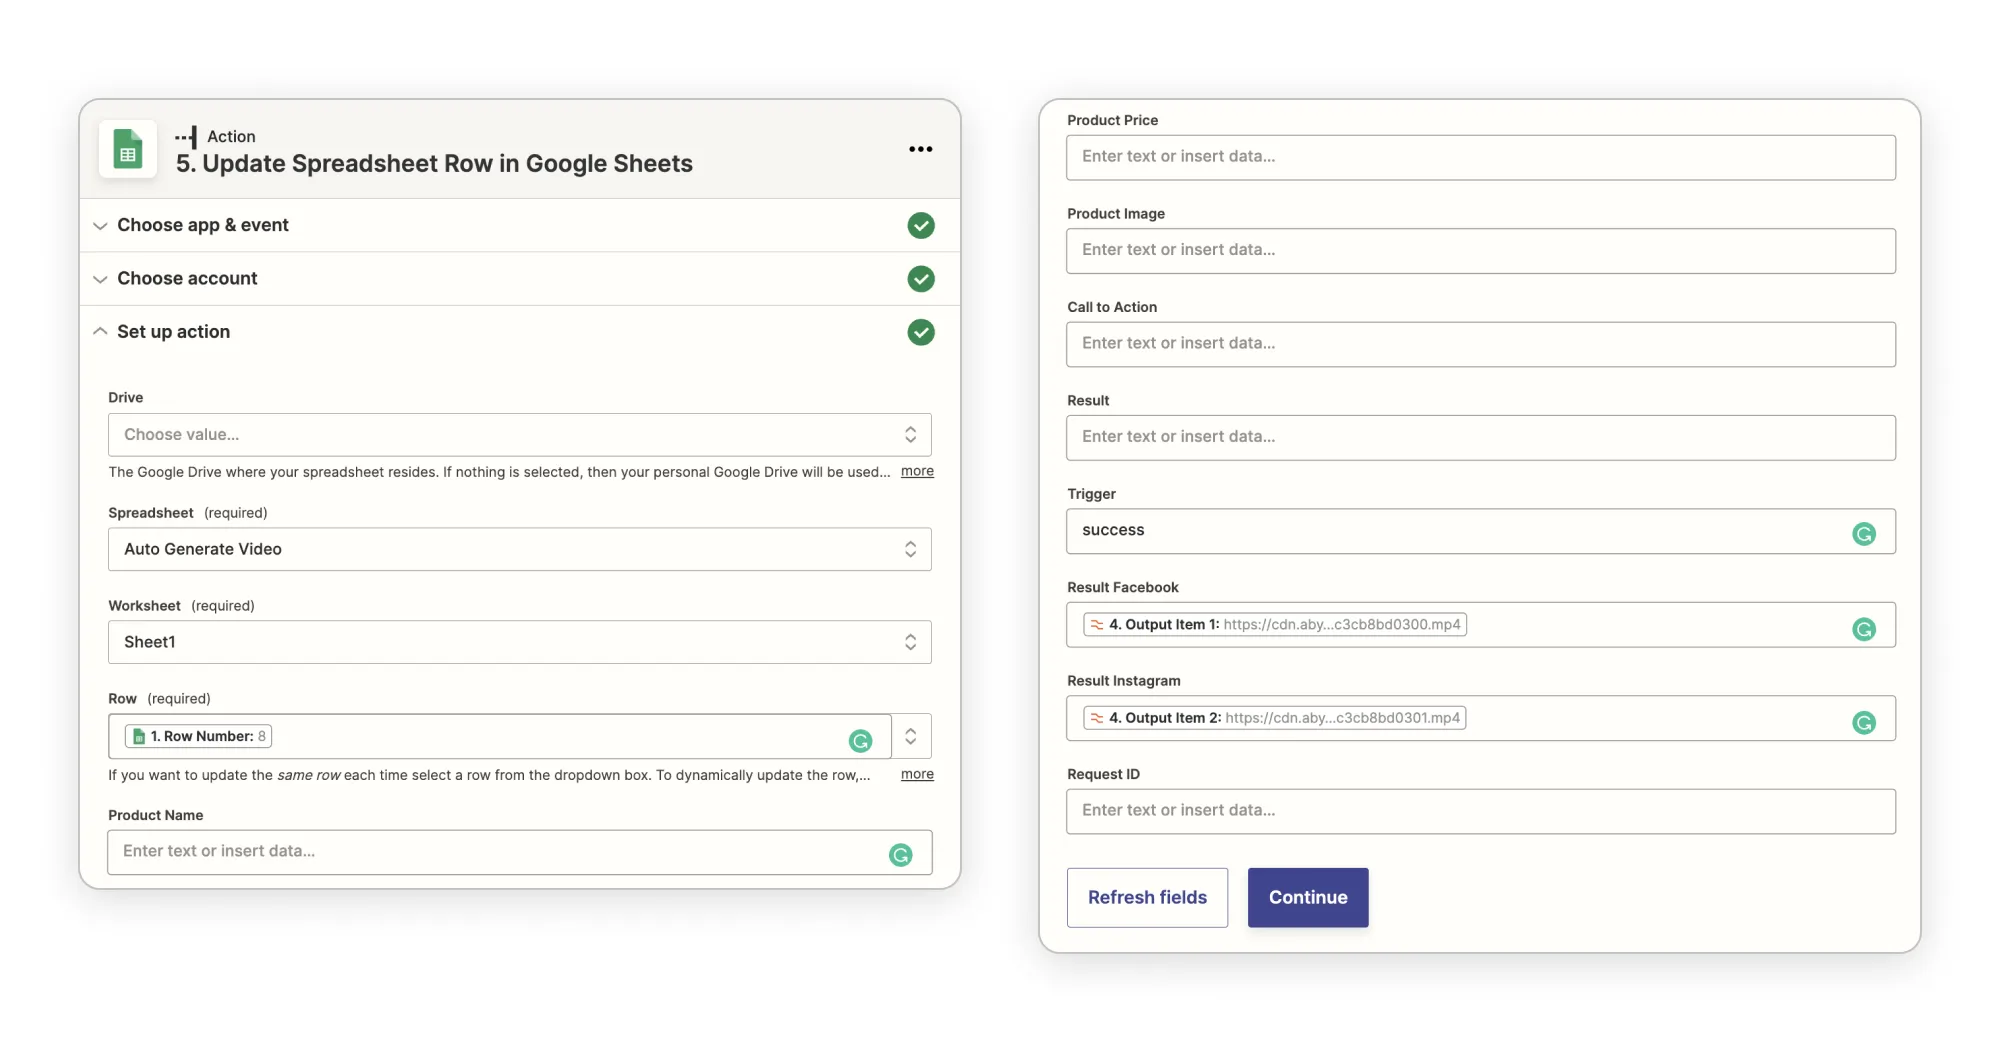
- Create a new Google Sheets module
- Choose « Update Row » in the « Actions » area
- Choose your Google Sheet file and Sheet
- Map the row number with the “custom value” → “Google Sheet” → “Row Number”. This will dynamically send the value of the row that has been processed in the first step.
- Send the Utilities result for “Output Item 1” in the “result facebook” cell
- Send the Utilities result for “Output Item 2” in the “result instagram” cell
- Update the “Trigger” cell with the Text “Success”
Step 6: Test the entire workflow
Once those 5 modules are configured and connected, you can click « Run Once » to launch your automated workflow. If everything goes right, you should have the link to a video in each of your Result Facebook and Result Instagram cells!
Tadaaaaa ! 🎉
As video files are quite large, they can take a while to be rendered by Abyssale but your Google Sheets file should now be updated with the result of all your video generation. Now that your Zap is live, you’ll be able to auto-generate videos whenever you add new content to your Google Sheets. If you’ve liked this content, feel free to read out other Zapier automation tutorials.


%20(14).webp)
.webp)
