In this tutorial we’ll see how to create instagram stories automatically thanks to Abyssale, Shopify & Zapier. For each new product we usually have to create several visuals to promote it on social media.What if we can automate this task for instagram stories visuals and trigger an image generation each time a new shopify product is published ? To help you better grasp how to do it we will use an example :
We are a company that sells decorative items & household linen. For the arrival of fall we have a new collection of plaids that we want to promote on social networks. So our goal today is to set up an automation that creates visuals for instagram stories with each new product publication of our collection on our shopify.
Create an insta story template
Create your Abyssale template from which you want your new product promotion instagram visuals to be based on.
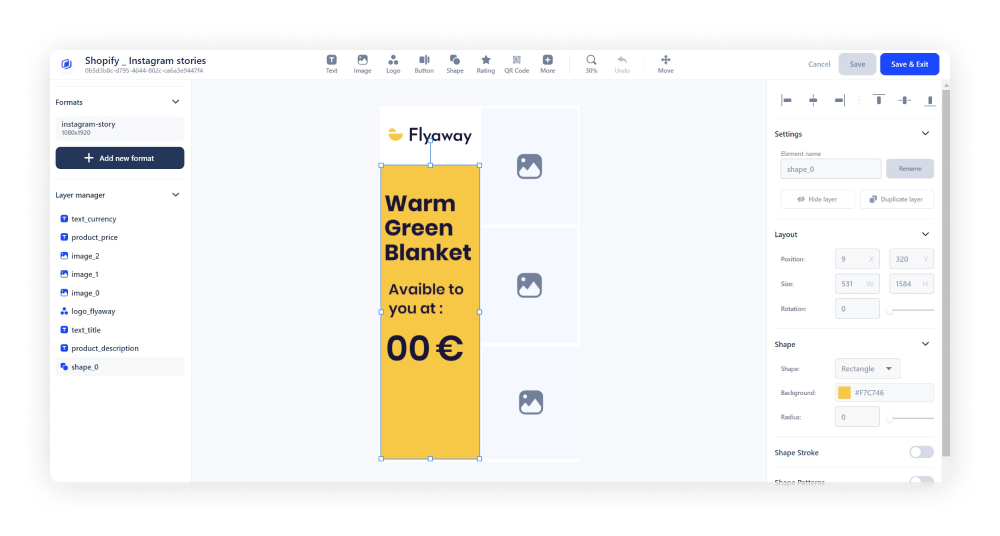
For our exemple, we chose a template with several images to promote 1 product , as our plaids collection showcase its blankets in different colors or in different use cases. (On this case the plaid can be used for the living room on a couch or a chair, but also for the bedroom as a bedspread.)
There are 2 things to pay attention to :
- The format : Of course for our exemple we need the instagram stories format
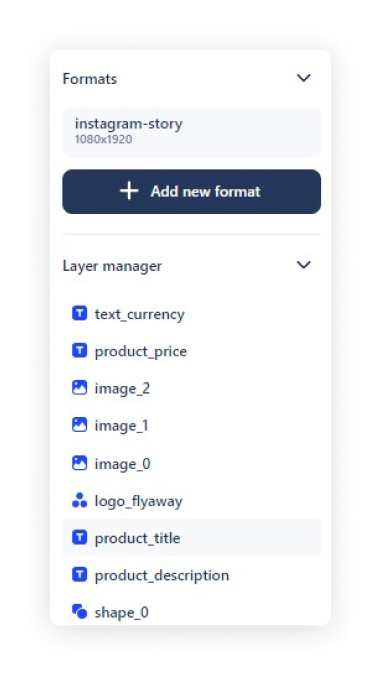
- The name of our layers : As always, it is really important to name them correctly in order to be efficient on zapier later
We named each image layer with a number and also named the other layers that can change according to the products :
- The product_title
- The product_price
- The product_description
Check your product info on Shopify
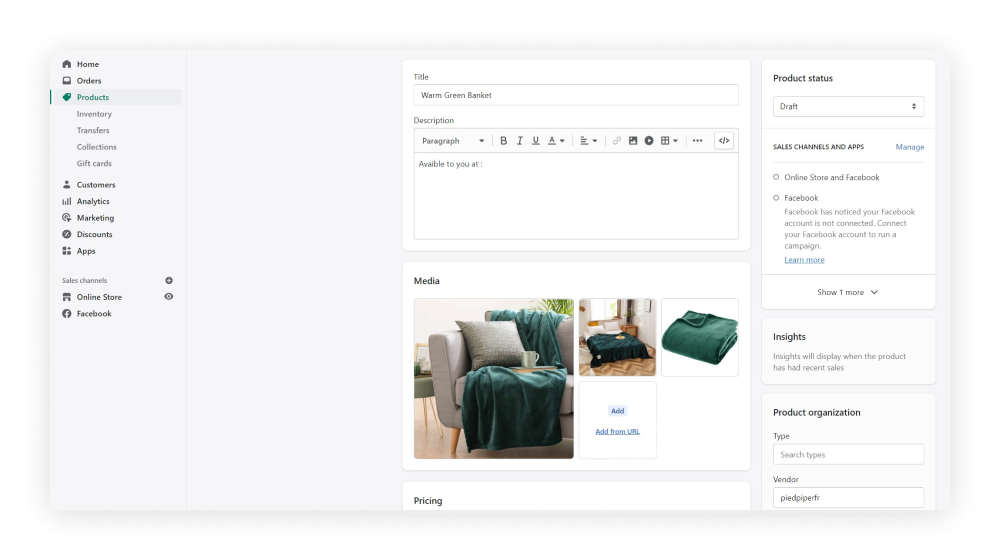
Then to test this automation, we’re adding our new product to shopify, we add 3 product pictures , a title, a price, a description, an inventory & of course we changed the product in “active” status.
Create your instagram story automation on Zapier
#1 Shopify module
First, we start by collecting the shopify new product Data.
Create a new zap
Create a trigger “New products in shopify” and connect your account
Select your product & identify the images URL & position
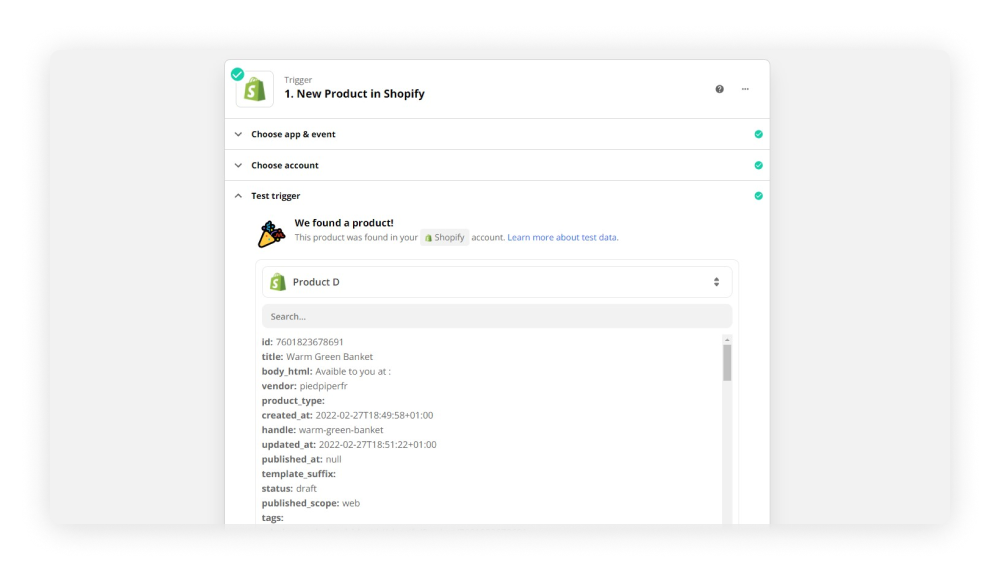
FIY : Shopify has a “main image” that will be showcased first on your product page, and others images possible.
The main image is to be found in the Image_ src section and the others in the images_src section all with their position.
In our exemple our visual has 3 images to display, the first will be the “main image” in shopify ( image_src) and the following ones will be the 2 others.(images_src, position 2 and 3)

#2 Formatter Module
Now we are trying to grab each image necessary for our template. For that, as we have 3 images, we need 3 action calls.
For the first image, (the main image on shopify) :
Create a Formatter by Zapier Action & Choose Utilities event
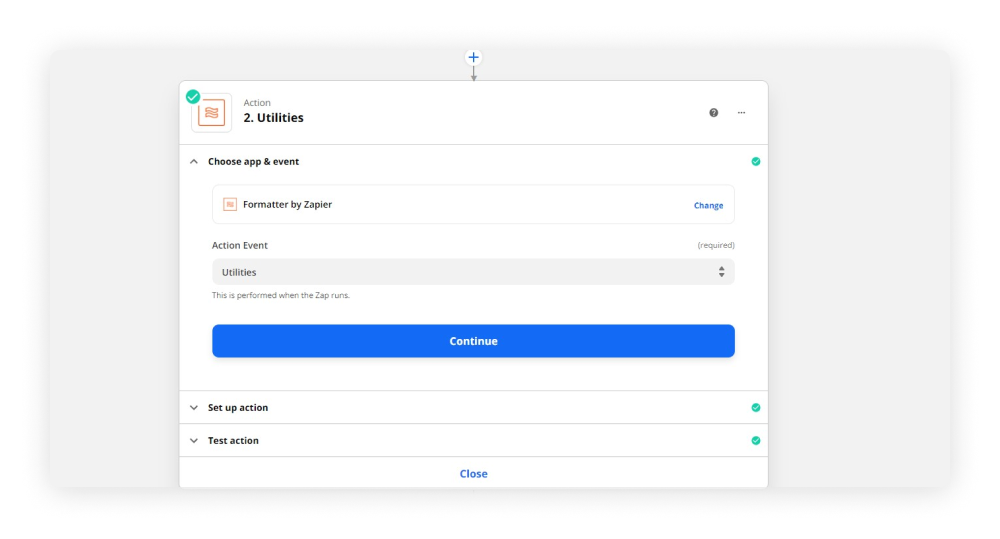
Next you have to set up your action.
Select Pick from list & the order of the operation, for us it is Choose last.
Then, we select our Input (that’s the image url) and as it is the main one we select image Src
To make sure we did right we chose Test & review in the text action section.
When doing that you should have an output corresponding to the URL of your first image.
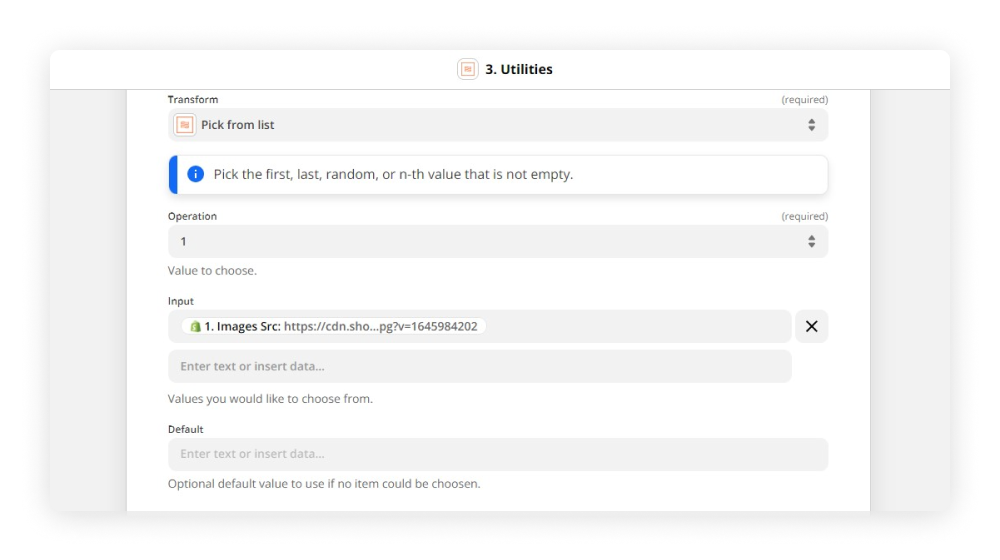
Now we are going to repeat this action for the 2 other images, and each time we :
create a Formatter action and utilities event
We select Images Src
For the field Operation we write the position of our image that we identified in step A
#3 Abyssale story generation module
Now that we have our data collected in shopify, and formatted by zapier for each images, we put it in our Abyssale template. Create an Abyssale action
Choose the event “Generate single image”
connect your account & choose the corresponding template
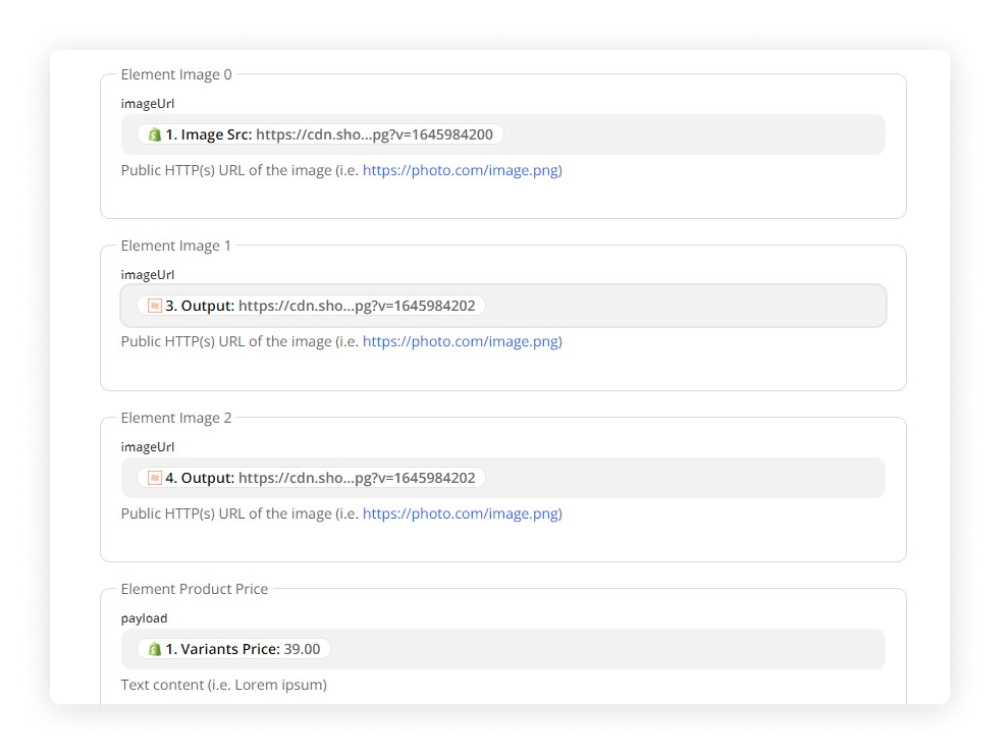
Now it’s time to match each layer of your template with the right data.
We matched our title, price and subtitle layer, with the product_title, product_price and product_description as mentioned above in step 1.
For the first image layer we matched it with shopify main image url → Image Src
For the second one,we matched it with the first formatter output url.
and for the last one we also match it with the formatter output url, but the second one this time.
Now you can test the action. To be sure you made it right, check that you receive the message “A banner was sent to Abyssale”
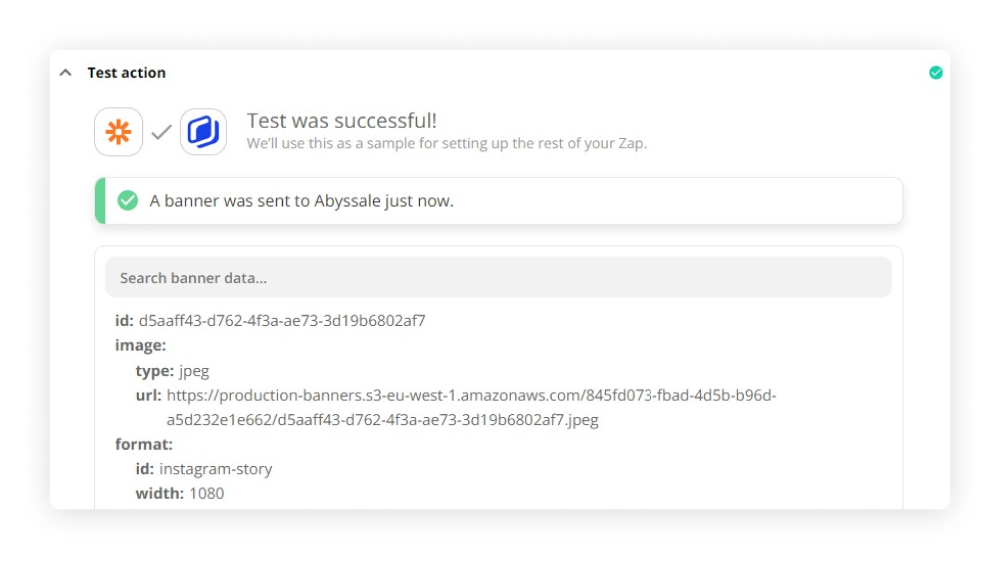
You can preview your image by copy pasting the URL of your image in the test action section.
If you’re satisfied with the result, you can Turn on Your Zap
Save our generated story images
To be sure to be able to see your Banners on Abyssale, you just need to activate one button.
Select your template in :
Abyssale > My template > The template of your instagram stories > Template Settings.
Then, starting from the bottom, the second button is “Store a copy of banners generated via API”. Switch it on and you will be able to see the images you’ve generated via Zapier or any other tool connected via your API Key :)

Our final result
Our final result looks like that
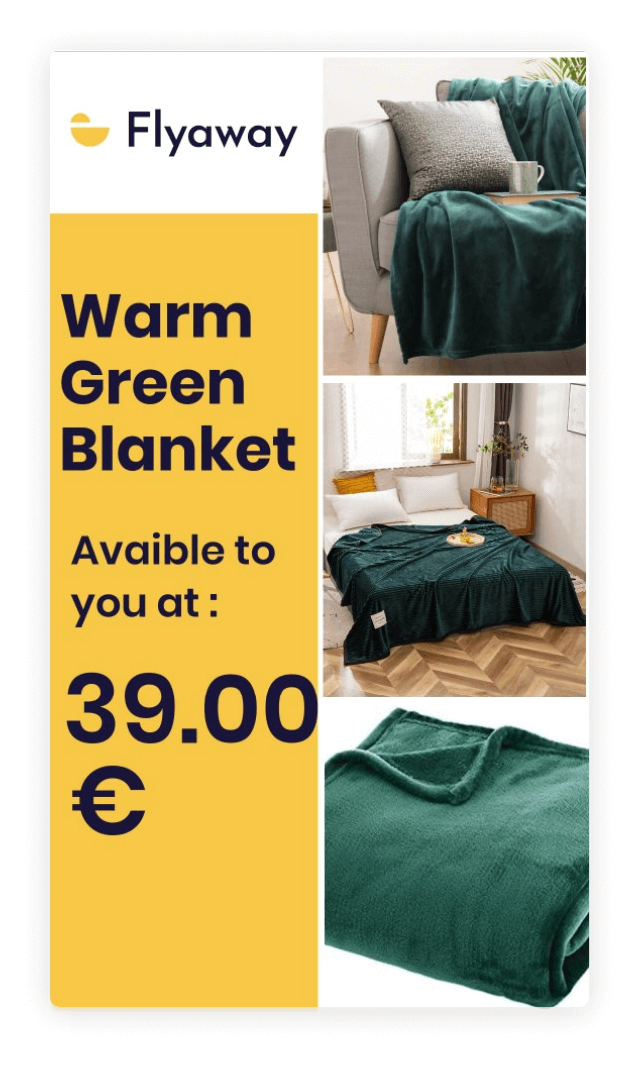
As you can see our 3 images to promote our green blanket have been included in the visual, in instagram format. The right title, price and description have been applied. And it is those parameters that will change according to each new product you add to your shopify. Each time, a new banner will be generated directly in your Abyssale account, in
My template > The template concerned > Banners.
And from there, you just have to share it on social media. To do that, we have actually created a tutorial to show you how to automate the posting of your images on Instagram, you can find it here :)