You mainly need Facebook images for 2 types of content: your organic posts on your company page and advertising.
A few stats that should convince you to create new facebook images regularly:
- The average Facebook page shares 1.55 posts per day, it means that just for your Facebook page you need to create 7 new images per week. You should post regularly on it because 66% of Facebook users visit a business page at least once a week. They probably want to see news on a daily basis.
- An average Facebook user clicks on 12 ads per month. Facebook provides the highest return on investment of all paid channels for a majority of companies. (HubSpot). If you would like to start advertising it's a really good channel especially for consumer goods. But you need to update your ads set frequently in order to counter the ad fatigue.
Facebook is a good channel to advertise your e-commerce website, but the image creation can be a really time consuming process. To ease the process we will see how to create Facebook images quickly using your Shopify products and Abyssale's Creative Automation. You can also check-out our 5 simple tips to speed up display advertising.
1/ Retrieve your Shopify products
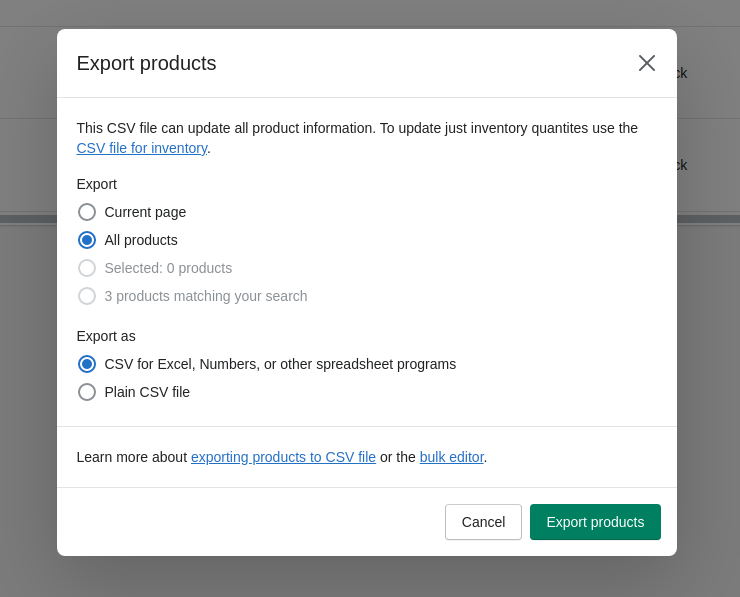
We will download all our Shopify products in a CSV file which is a tabular format that can be interpreted by tools like Google Sheets or Microsoft Excel.
First you need to go your Shopify admin page then Products > all products and click on the top right button export.

When your products have finished exporting, you should receive an email with the CSV file in it.
2/ Create an Abyssale Facebook Template
In order to create your Facebook images you can design a template or choose one from the Abyssale template library.
In order to keep it simple, we will choose a template from our library.
1/ Go to your Abyssale account and click on "Create new template", then "browse templates" and choose the template you want to generate facebook images from
2/ Update the template with your company branding. For exemple update the default logo, background images, texts and colors.
3/ When you are pleased with the general aspect of your template, click on save.
3/ Generate facebook images based on Shopify products
Once you template is created, click generate banners on the template overview page ans select the batch image generation method. This method will allow you to generate a large amount of images at once from a specific set of data.
1/ Fill the operation name with the name of your facebook advertising campaign. It will automatically create a folder named after the operation. It will be easier to find it later.
2/ Select the formats. By default, Abyssale templates come with 12 formats for the most popular marketing channels. For Facebook ads we recommend you stick to the Facebook feed, Facebook square and Instagram story formats as they are the most popular facebook advertising formats.
3/ As we have downloaded a CSV file, we will use the .CSV import generation method. We will match the different columns of the CSV with our template's layers as follow:
- image with Image Src: Your Shopify product will will be updated for each images.
- tshirt_name with Title: The name will be updated with your product title.
- previous_price with Variant Compare At Price: It will be used to display the previous priced crossed out.
- current_price with Variant Price: Each images will be updated with the current price.
- stock with Variant Inventory Qty: It will set forth the quantity to create a feeling of fear of missing out the product.

4/ Once your CSV is imported, your data will be automatically added to an Abyssale content management spreadsheet. Each row corresponds to a product that you have in your Shopify catalog. Rows have been filled according to the parameters we have defined earlier. You can modify informations or add new rows if you want to personalize your images even more. For exemple you can define a different background color for shapes, texts etc...

5/ If you don't want to create images for your entire catalog, you can either disable rows by hovering on the number of the left side, click on the checkbox and click on Disable rows. Or you can decide to delete rows by clicking on the bin which is located on the right side of rows.
6/ Once you are satisfied click on save & close
7/ When you are ready to start generating your facebook images click on Save & Start generating

4/ Result
Click on view banners to display your generated images. Here are some exemple of what you could get:
The same advertising / social media post with different formats:
5/ Felicitations 🎉
You are now ready to create facebook format images from your Shopify catalog! This tutorial showed you how to generate Facebook images, but you can also automate the generation of Instagram or Pinterest posts for exemple.


.webp)

.webp)
.webp)

.webp)
.webp)
.webp)
.webp)
.webp)
.webp)
.webp)
.webp)

.webp)


